Docker Fundamentals for Data Engineers
1. Introduction
Docker can be overwhelming to start with. Most data projects use Docker to set up the data infra locally (and often in production). Setting up data tools locally without Docker is (usually)a nightmare! The official docker documentation, while extremely instructive, does not provide a simple guide covering the basics for setting up data infrastructure. If you
Are overwhelmed by docker/containerization
Are having a hard time learning it because you do not see a practical application for it
Are confused by all the documentation online that does not provide a bigger picture view of why to use docker
Unimpressed with the examples online, which seem straightforward and not representative of actual data infra?
Then this post is for you. This post will cover the fundamental concepts one will need to set up complex data infra locally. By the end of the post, you will be able to use docker to run any data tool (that is open source) locally on your laptop. In the post, we set up a Spark cluster, Postgres database, and minio (OSS cloud storage system).
2. Docker concepts
Docker is used to containerize your application. You can run Docker on any machine, and you can think of it as running a separate OS (not exactly, but close enough) on the machine. What Docker provides is the ability to replicate the OS and its packages (e.g., Python modules) across machines so that you don’t run into “hey, that worked on my computer” type issues.
Here is an overview of the concepts needed to understand docker for data infra:
GitHub Repo Link
To run the code in this post, you’ll need to install the following:
Windows users: please setup WSL and a local Ubuntu Virtual machine following the instructions here . Install the above prerequisites on your Ubuntu terminal; if you have trouble installing docker, follow the steps here (only Step 1 is necessary).
All the commands shown below are to be run via the terminal (use the Ubuntu terminal for WSL users).
git clone https://github.com/josephmachado/docker_for_data_engineers.git
cd efficient_data_processing_spark
# Build our custom image based off of our local Dockerfile
docker compose build spark-master
# start containers
docker compose up --build -d --scale spark-worker=2
docker ps # See list of running docker containers and their settings
# stop containers
docker compose down
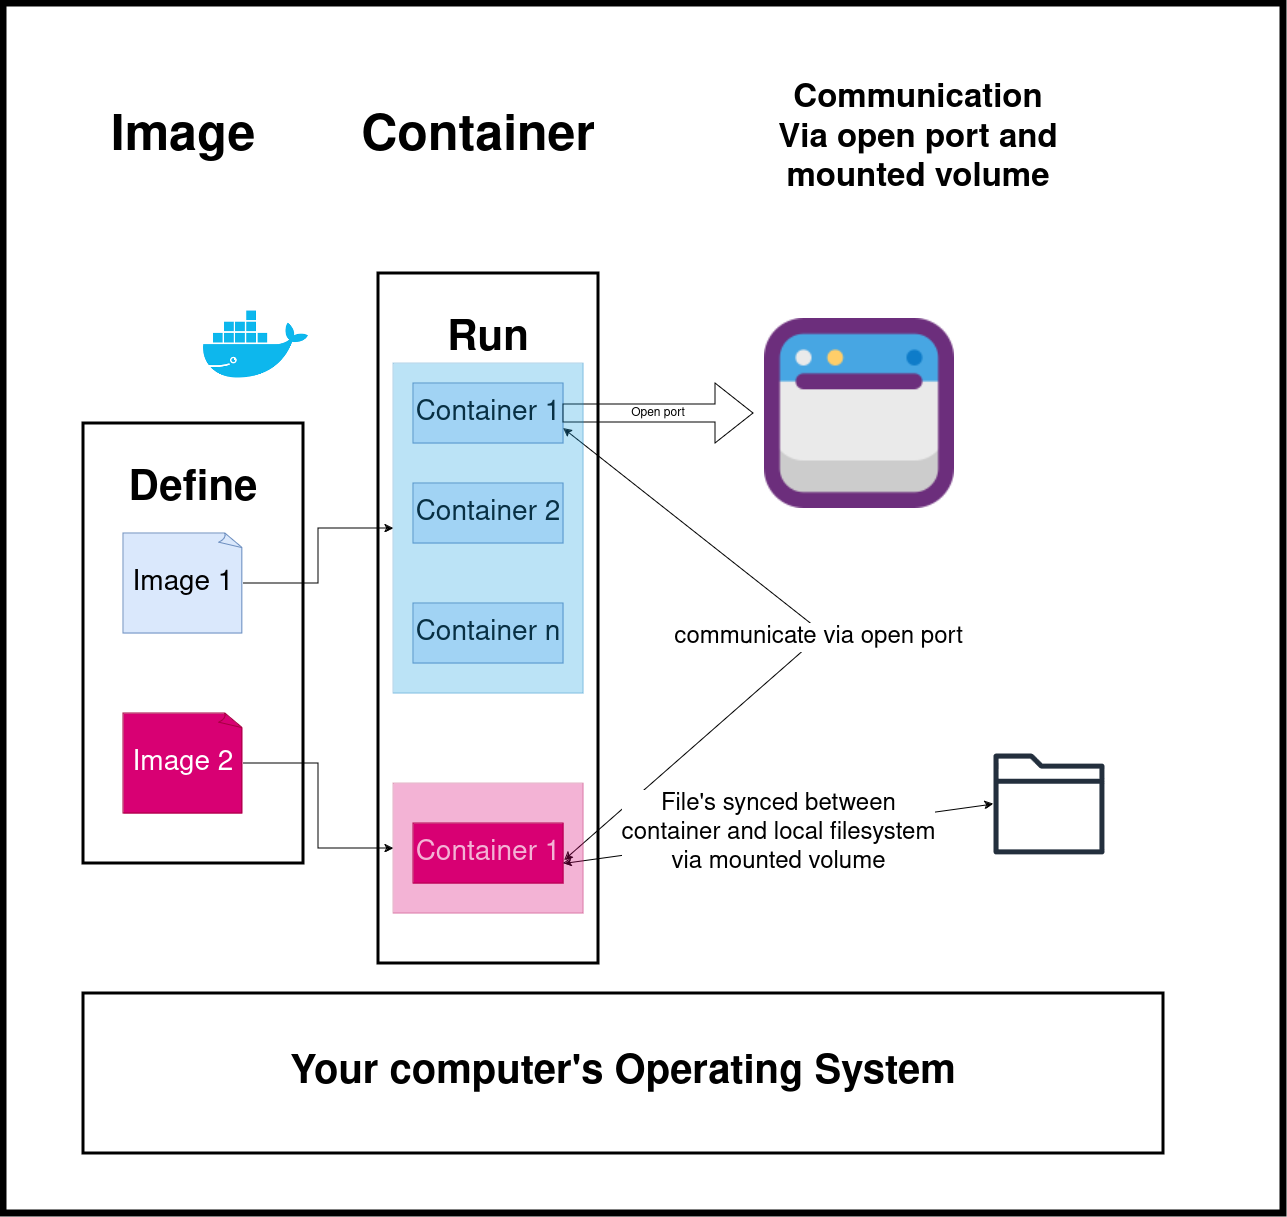
2.1. Define the OS and its configurations with an image
An image is a blueprint to create your docker container. You can define the modules to install, variables to set, etc. Let’s consider our example:
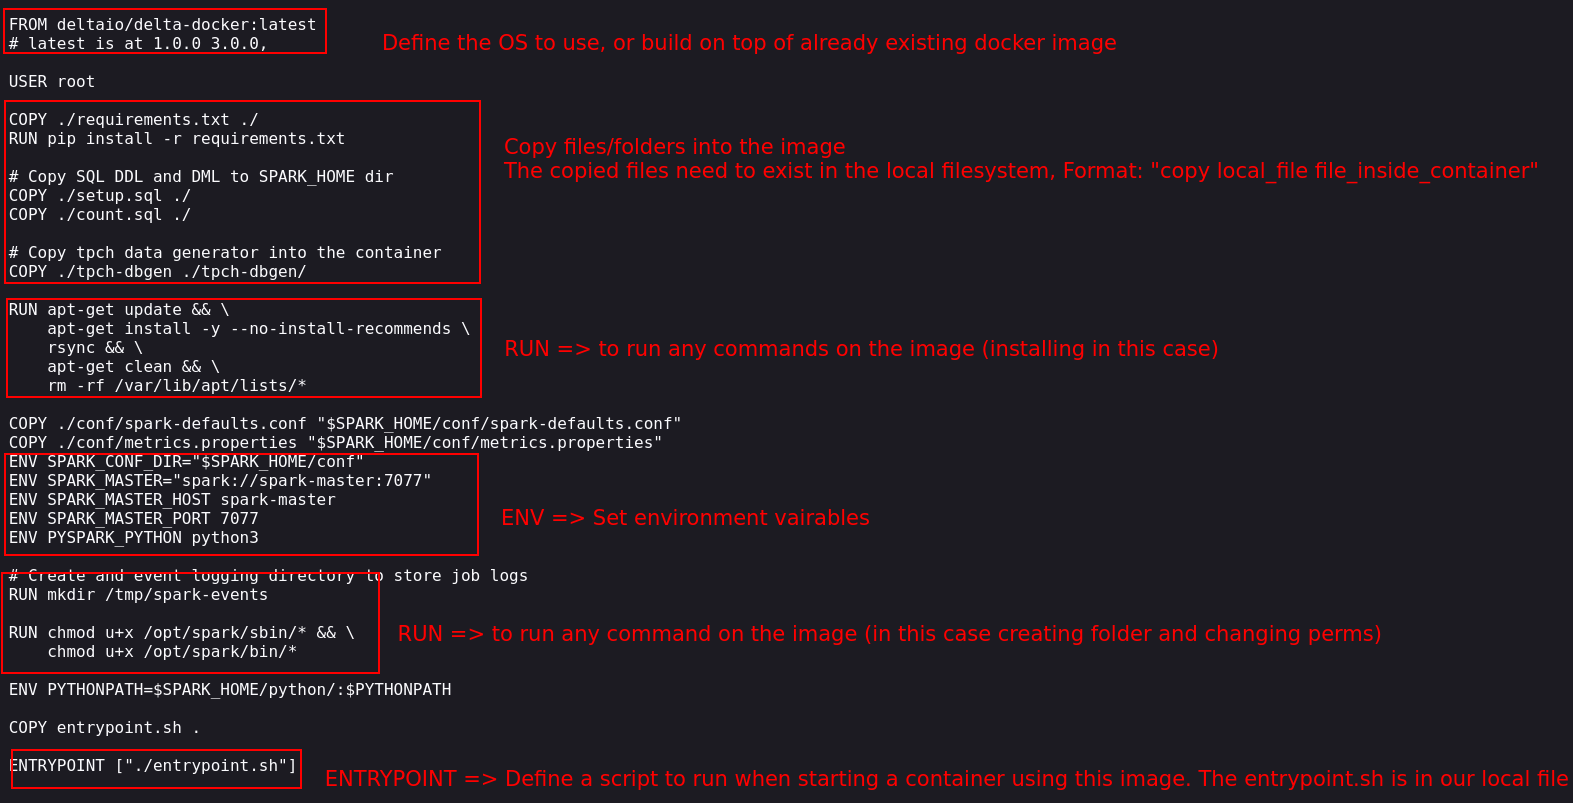
The commands in the docker image (usually called Dockerfile ) are run in order. Let’s go over the key commands:
FROM: We need a base operating system on which to set our configurations. We can also use existing Docker images available at the Docker Hub and add our config on top of them. In our example, we use the official Delta Lake Docker image.COPY: Copy is used to copy files or folders from our local filesystem to the image. The copy command is usually used when building the docker image to copy settings, static files, etc. In our example, we copy over thetpch-dbgenfolder, which contains the logic to create tpch data. We also copy over our requirements.txt file and our entrypoint.sh file.RUN: Run is used to run a command in the shell terminal of your image. It is typically used to install libraries, create folders, etc.ENV: This command sets the image’s environment variables. In our example, we set Spark environment variables.ENTRYPOINT: The entrypoint command executes a script when the image starts. In our example, we use a script file (entrypoint.sh) to start spark master and worker nodes depending on the inputs given to the docker cli when starting a container from this image.
2.2. Use the image to run containers
Containers are the actual running virtual machines. We use images(Dockerfile ) to create docker containers. We can spin up one or more containers from a given image.
2.2.1. Communicate between containers and local OS
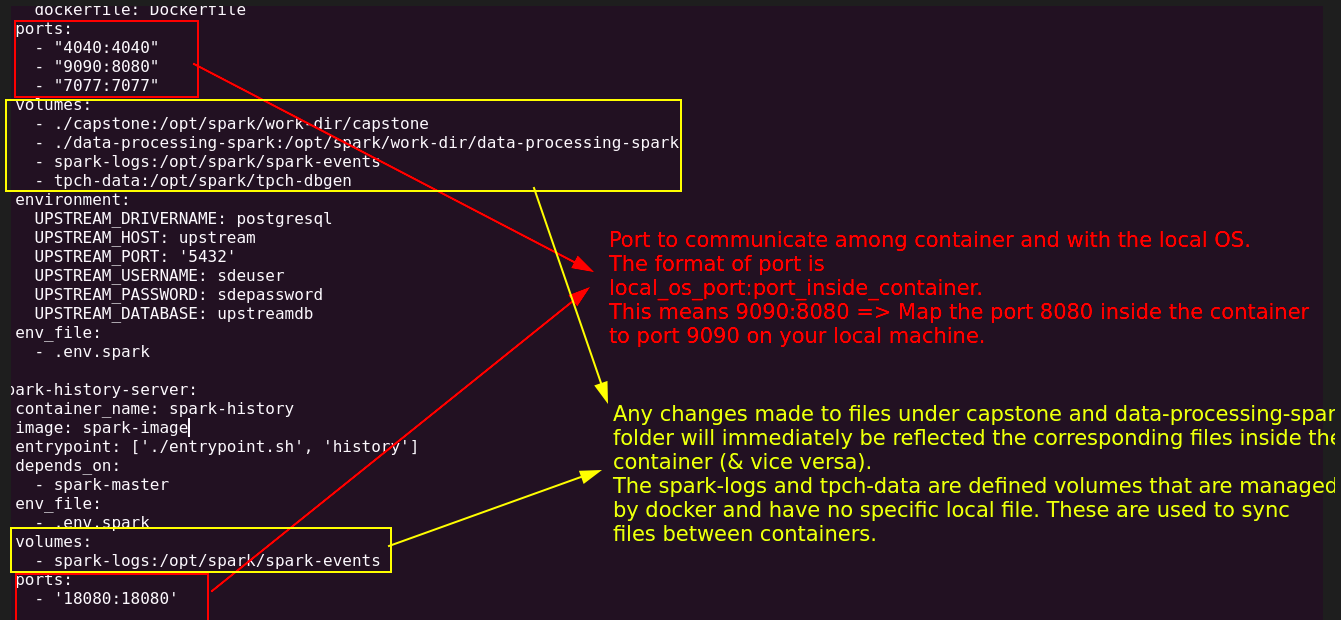
Typically, with data infra, multiple containers run. When we want the container to communicate with them and the local operating system, we need to enable it via ports for http-based interactions. In our example, we ensure that Spark clusters can talk with each other and with the local operating system by defining ports in our docker-compose.yml file.
Using mounted volumes, we can also ensure that files are synced between the containers and the local operating system. In addition to syncing local files, we can also create docker volumes to sync files between our containers.
2.2.2. Start containers with docker CLI or compose
We have seen how images are blueprints for containers. We need to use the docker clito start a container. With the docker cli, we can define the image to use, the container’s name, volume mounts, open ports, etc. For example, to start our Spark master container, we can use the following:
docker run -d \
  --name spark-master \
  --entrypoint ./entrypoint.sh \
  -p 4040:4040 \
  -p 9090:8080 \
  -p 7077:7077 \
  -v "$(pwd)/capstone:/opt/spark/work-dir/capstone" \
  -v "$(pwd)/data-processing-spark:/opt/spark/work-dir/data-processing-spark" \
  -v spark-logs:/opt/spark/spark-events \
  -v tpch-data:/opt/spark/tpch-dbgen \
  --env-file .env.spark \
  spark-image master
However, with most data systems, we will need to ensure multiple systems are running. While we can use docker cli to do this, a better option is to use docker compose to orchestrate the different containers required. With docker compose, we can define all our settings in one file and ensure that they are started in the order we prefer.
Our docker compose is defined here . With our docker compose defined, starting our containers is a simple command, as shown below:
docker compose up --build -d --scale spark-worker=2
The command will, by default, look for a file called docker-compose.yml in the directory in which it is run. We use the --build command to tell docker to use the image to create containers (without build, docker will use any previously created image, which may not reflect the changes you make to the Dockerfile). We also use --scale to ask docker to create two spark-worker containers. Note that we define our container names in the docker-compose.yml
file.
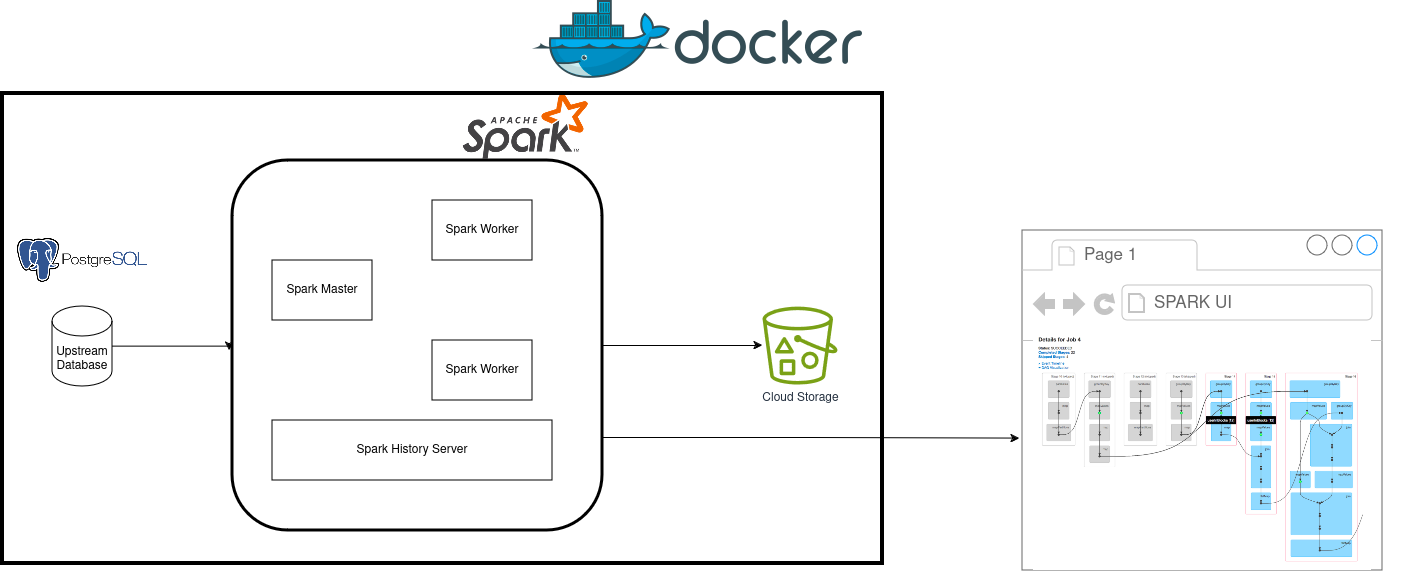
In our setup, we have four systems specified in the docker compose yaml file; they are
Postgres database: We use a Postgres database to simulate an upstream application database.Spark cluster: We create a spark cluster with a master and two workers, where the data is processed. The spark cluster also includes a history server, which displays the logs and resource utilization (Spark UI) for completed/failed spark applications.Minio: Minio is open-source software that has a fully compatible API with the AWS S3 cloud storage system. We use minio to replicate S3 locally.createbuckets: This is a short-lived docker container that creates the necessary folder structure in our minio storage system before turning off.
2.2.3. Executing commands in your docker container
Typically, docker containers are meant to live for the duration of the command to be executed on them. In our use case, since we need our infrastructure to be always on, we use the entrypoint.sh to start Spark master and worker servers, which keeps the containers running.
Using the exec command, you can submit commands to be run in a specific container. For example, we can use the following to open a bash terminal in our spark-master container:
docker exec -ti spark-master bash
# You will be in the master container bash shell
exit # exit the container
Note that the -ti indicates that this will be run in an interactive mode. As shown below, we can run a command without interactive mode and get an output.
docker exec spark-master echo hello
# prints hello
3. Conclusion
In this post, we covered the fundamental concepts one will need to set up complex data infra locally. To recap, we saw how to
- Define an OS with an image
- Use images to start containers
- Enable containers to talk among each other and the local OS with ports and mounted volumes
The next time you are faced with installing a complex data infrastructure locally, use the above concepts to create and run containers. Your colleagues will be grateful!
4. References
If you found this article helpful, share it with a friend or colleague using one of the socials below!